Tuesday, August 25, 2020

Lesson 6, Rule of Thirds, Part 2 of 2, Serlio


The posts in this series  Lessons 1-7  are :

 https://www.jgrarchitect.com/2020/04/lessons.html

 https://www.jgrarchitect.com/2020/04/practical-geometry-lessons-2.html

 https://www.jgrarchitect.com/2020/04/practical-geometry-lesson-3.html

 https://www.jgrarchitect.com/2020/04/practical-geometry-lesson-4.html

https://www.jgrarchitect.com/2020/04/practical-geometry-lesson-4b-old-first.html

https://www.jgrarchitect.com/2020/06/practical-geometry-lessons-lesson-5.html

https://www.jgrarchitect.com/2020/06/practical-geometry-lesson-5-addendum.html

https://www.jgrarchitect.com/2020/08/lesson-6-rule-of-thirds-part-1_21.html

https://www.jgrarchitect.com/2020/08/lesson-6-rule-of-thirds-part-2-serlio.html
 
https://www.jgrarchitect.com/2020/09/lesson-7-how-to-layout-frame-with-lines.html 


Friday, August 21, 2020

Lesson 6: The Rule of Thirds, Part 1of 2


The Rule of Thirds is what artists call the grid that appears on your cell phone. It helps you compose and edit.

A variation of this is used in Practical Geometry. 


Sebastiano Serlio used this diagram in his book, On Architecture, published  in 1545.  He writes simple instructions for the reader; he says to construct the 'lines'. 

Note that the triangle (with its base at the bottom of the drawing) intersects the diagonals at the the upper corners of the door.  The width of the square is divided into thirds.  

Check how the division into thirds in the square above this drawing  lines up with those intersections.  Serlio is using a a variation of the Rule of Thirds.


Like Owen Biddle (see Lesson 5) Serlio sets out basic Geometry as used in construction in Book 1.

Then he explains how to solve problems.  He does not show how he knows where to draw the lines shown above. He assumes the reader knows. 

 Here are the instructions:


Draw a square;

Add the diagonals to your square. Where they cross in the center. You have point 1.  


Divide one side of your square in half. Now you have  points 1 and 2.
With 2 points you can draw a line.


Add diagonals in each new rectangle.            


 Add the diagonals from the square.                                            

If you were drawing this for a construction project on wood, on masonry, or on paper, you would not have separate squares.  All lines would be on your first square.  I have drawn each step without the extra lines for clarity.

Do you see that the center line does not pass through the intersection of the diagonals? If you were the builder you would know that your diagonals will match when the line in centered. In this diagram they don't. So you would move  your center line.

This is the diagram for Serlio's drawing for the door.


 For the Rule of Thirds (as we know it today) add the diagonals for the rectangles on both sides of the square.            

Note that you have intersections (4 points) not just where the lines  divide the square into smaller squares, but where the diagonals cross those lines.  2 points above the horizontal center line and 2 points below. Or: 2 on the right side of the vertical center line and 2 on the left.

I have deliberately not added black points where the lines cross. You who are reading this will see it more clearly if you find those points yourself. 


Connect those new points and extend the lines across the square. 
You have drawn the Rule of Thirds.


Similar diagonals could be drawn from the left to the right side and vice versa. 


 I drew all the diagonals on graph paper to make it easier to follow.  The next lines to add would be the diagonals of the small squares.
The line does not come back to its beginning until it has continued through the complete pattern


A post on Serlio. https://www.jgrarchitect.com/2017/04/serlio-writes-about-practical-geometry.html 


The posts in this series  Lessons 1-7  are :

 https://www.jgrarchitect.com/2020/04/lessons.html

 https://www.jgrarchitect.com/2020/04/practical-geometry-lessons-2.html

 https://www.jgrarchitect.com/2020/04/practical-geometry-lesson-3.html

 https://www.jgrarchitect.com/2020/04/practical-geometry-lesson-4.html

https://www.jgrarchitect.com/2020/04/practical-geometry-lesson-4b-old-first.html

https://www.jgrarchitect.com/2020/06/practical-geometry-lessons-lesson-5.html

https://www.jgrarchitect.com/2020/06/practical-geometry-lesson-5-addendum.html

https://www.jgrarchitect.com/2020/08/lesson-6-rule-of-thirds-part-1_21.html

https://www.jgrarchitect.com/2020/08/lesson-6-rule-of-thirds-part-2-serlio.html
 
https://www.jgrarchitect.com/2020/09/lesson-7-how-to-layout-frame-with-lines.html 


Thursday, August 6, 2020

Owen Biddle's 'Young Carpenter's Assistant' , Plate I, G

A note on Owen Biddle's Plate I, Diagram G. in his pattern book for beginning carpenters. *

 
I wrote about Diagram G on this post: https://www.jgrarchitect.com/2020/06/practical-geometry-lessons-lesson-5.html

I said that Biddle was not just introducing his 'carpenter assistant' to geometry; in Diagram G Biddle was explaining how to layout a square corner to work out a structural detail, cut a board, or set a frame on site.


Since then I have explored the theoretical geometry of that diagram.

The number of right angles which can be drawn in a circle is infinite. The rule always works. That understanding is part of why geometry is seen as mystical or sacred.

This 'squaring the circle' diagram is from
Robert Lawlor's Sacred Geometry*. (page 77, diagram 7.5)
It uses a geometry similar geometry to Biddle's diagram G: a diameter and an angle. Here the diameters are evenly spaced and the same angle  is used at every point on the circumference. But the angle is not 90*. It is not a 'square angle'.
This is decorative, not structural.
The shapes do not close. The line continues for 5 rotations. It does not create a square, but seeks to define the perimeter of a circle with straight lines. 
,
I am often told that I work with Sacred Geometry, that the geometric patterns I recover are theoretical, mystical, and sacred. I agree they are geometry. No, they are not sacred. They are practical. They are geometry used in construction.


Here is how Biddle's diagram comes about: 


Begin with  a point  - A


Choose a radius - A-B,  and draw a circle. Using the daisy wheel find the diameter - B- A- C, dotted and dashed line.


Pick a point on the circumference of the circle - D.

Here I have chosen 3 different D's  at random.

Connect B-D and D-C.


Each diagram will have a 90* (right) angle at the intersection of  B-D-C.


Wherever the D is placed. the angle will be 90*.


Biddle's Diagram G begins with my line B-D.
It describes how to find my 90* angle of B-D-C. (his a-b-c) The answer is to find the diameter of a circle (a-d-c) that intersects a. That will give c. That will give the 90* the carpenter needs.


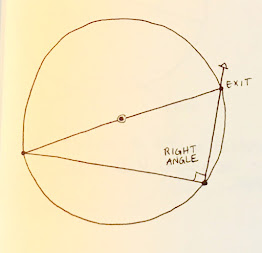
By Hound and Eye* has a very similar diagram for drawing a right angle .
The book is a  guide to furniture design, full of practical geometry. Each geometric problem is described step by step; practice work sheets are included.
This pattern is the beginning of a handmade try square. 


*Owen Biddle's The Young Carpenter's Assistant, 1805, Philadelphia. Dover Publishing  reprint,  See my Bibliography for more information.

*Robert Lawlor, Sacred Geometry, Philosophy and Practice, 1982, Thames and Hudson, London.

*Geo.R. Walker & Jim Tolpin, By Hound and Eye, A Plain & Easy Guide to Designing Furniture with No Further Trouble, 2013,  Lost Art Press, Kentucky The diagram shown above is from page 57.


This pattern is 4 overlapping hexagons.
My granddaughter, who is 7, watched me add the images to this post.
She wanted us to 'square the circle'. I did, using right angles where the diameters met the circumference. That produced these overlapping 6 hexagons, not squares.


She watched closely and observed that accurate work was not easy: my lines did not always cross exactly in the center of the circle. When we finished she asked me to erase all the diameters. This is the result. Maybe she will show me later what she added to the copy I printed for her.