Showing posts with label circle to square. Show all posts

Friday, September 13, 2024

From a Circle to the Pythagorean Triangle via the Schifferstadt House.


The  geometry used to lay out the Schiefferstadt House, 1755, was the 3/4/5 rectangle. Probably.

'Probably' because Practical Geometry, the use of geometry in construction, was taught by doing, not by reading and writing. The drawings we have assume a knowledge of basic geometric patterns. Written records are rare and incomplete.

The stone walls for the House were laid one row after another, consecutively. Unlike wood frame structures which are form and infill, in masonry buildings the  form and the skin are one. 

This is the back of the house, showing not just the main stone house and the brick wing, but the extensive stone foundation.


Every wall of the House needed to be trued as it was built. Here is a wall in the cellar: laid up stone.  Consider how hard those slabs would have been to adjust later on. The walls were trued with a plumb line and the lines of 3/4/5 triangle as they rose.*  


The frame of a wood structures determines its size, its corners, its form. The parts for the frame, the studs and braces, are cut and assembled. The shape can be adjusted, changed, trued using lines, even after it is raised. This image of a barn frame is from Wm Pain's The  Carpenter's Pocket Dictionary, 1781, redrawn by Eric Sloane.**  


The stone and brick buildings I have studied use the 3/4/5 triangle. Chimney blocks are 3/4/5 rectangles. 

So, why didn't I immediately try the 3/4/5 triangle when I looked at the house geometry? Well, I wondered if the Schiefferstadts'  traditional building patterns, brought with them from Germany, would be different from those I'd studied before, the vernacular housing built by English, Dutch, and French immigrants. Those began with the circle and its square. I began there too, looking for differences. I missed the obvious: the stone. The 3/4/5 rectangle easily fits the plans, the simple solution. KISS***


Then, as I was playing with the circle and its square (left image), this happened.

I saw that when I begin with the square derived from the radius, its circle and lines (left image), I can easy to locate 6 other points around the circumference , making 12 equidistant points around the circumference, (center image). I saw that circle geometry 'finds' the 3/4/5 rectangle (right image); that the Pythagorean Theorem is a 'short cut' using the 3 and 4 units that are already there.

On the left: the 12 pointed daisy wheel.  On the right: the 3/4/5 rectangle with units, and the 3/4/5 triangle.


*The walls are 'kept in line'. I am often surprised to realize that a common phrase, such as '"staying in line", probably began as construction lingo.

** Wm Pain, The Carpenter's Pocket Directory, London, 1781.

     Eric Sloane, An Age of Barns, Voyageur Press, Minneapolis, MN, 2001, p.37. originally published by Funk&Wagnals, c. 1967.  

*** KISS: "keep it simple, stupid"

The earlier posts on the Schiefferstadt House:  

https://www.jgrarchitect.com/2024/08/a-closer-look-at-schiefferstadt-house.html

https://www.jgrarchitect.com/2024/07/the-geometry-of-schiefferstadt-house.html


Thursday, August 8, 2024

A closer look at the Schiefferstadt House practical geometry


Please see my update:  https://www.jgrarchitect.com/2024/09/from-circle-to-pythagorean-triangle-via.html
I am not deleting this post because of my last paragraphs: I find the ways the Lines and layouts in Practical Geometry overlap need more consideration.* 


The lay out of the Schiefferstadt House,* uses a geometric pattern that was well known at the 1750's: the rule for drawing a square starting with a radius and a circle.

The diagram begins with the daisy wheel, scribed by a compass or a divider.  The 'petals' created by the 6 arcs of the radius around the circle make 6 points on the circumference.

The length of the radius for the circle is the width of the house.


When those points of the daisy wheel are joined they create Lines - dashed lines in the diagram. (Basic Euclidean geometry : 2 points are required to create a Line.)  The arcs of the radii cross those Lines to lay out a square. **


When one point of the divider, still opened to the width of the radius of the circle, is set on each of the 2 upper corners of the square, and the arcs swung, the arcs cross the circumference at the top of the circle.  Stepping off the radius around the circumference, will locate 6 more points.  All 12 points are equidistant from each other; all can be used for layout and design.

There is also a short cut to those upper 2 points; the place where the arcs cross the daisy wheel petals are points. 2 points = a Line. That Line extended is the same Line shown in my next diagram.  


The carpenter of the Schiefferstadt House could have used this geometry to step off  a rectangle about 18 units wide x 26 units long.  If his compass was open to a 2 ft span, the floor plan would have been 36 ft.wide  x 52 ft long. He would have trued his rectangle by checking that his diagonals matched, just as builders do today.


*

However the carpenter could also have used the square and its diagonal to lay out the plan. Those arcs would cross the circumference at the same place (dashed line), but they would cross the vertical lines of the rectangle about one unit higher than if the 12 points had been used (see the points where the dashed and red lines cross the circumference).  

This would make the floor plan 36 ft wide x 54 ft long. That's not much longer,  probably of little consequence to the design. However if the mason and the the framer were not using the same geometric progression (both using the first diagram or both using the second) the stone foundation and the interior wood frame would not have fit together. 


The drawings made c. 1978 for the restoration of the Schiefferstadt House may give me more information. The Frederick County Landmarks Foundation is sending prints. 

I will be looking for the simplest and quickest layout. I find that a builder tends to use the same same geometric progression for his plans and elevations. The geometry is one of his tools. The repetition of one pattern and one unit of measurement would be efficient and leave fewer chances for mistakes.  

If another layout is introduced it is usually the work of a craftsman whose work comes later - the finish carpenter adding a mantle, or the mason building a firebox and flu. Each might prefer a different system.

* The Schiefferstadt House, Frederick, Maryland, built in 1755, owned by The Frederick County Landmarks Foundation.  See my previous post for the geometry of the floor plan: https://www.jgrarchitect.com/2024/07/the-geometry-of-schiefferstadt-house.html


**2  basic practical geometry diagrams:

The diagram laying out how the radius of a circle can become the side of a square.


 Audel's Carpenters and Builders Guides , published in 1923, shows this diagram.

100 years ago, this geometry was common and practical knowledge.


Tuesday, November 7, 2023

The Practical Geometry of the Parson Barnard House: the Floor Plan


The Parson Barnard House, North Andover, Massachusetts, built in 1715. This picture was taken in 2022.


The original house is the front (left) section: 2 rooms up and down, each with a fireplace. The chimney in the middle served all the fireplaces and acted as a radiator.

The saltbox extension was added c.1720. The rear wing dates to the 1950's.


John Abbott measured and drew the floor plans and elevations of the house for HABS in 1934. At that time it was thought that Simon Bradstreet had lived here. Now we know the families of the Reverend Thomas Barnard and his son, the Reverend John Barnard, were the first residents from 1715  to 1757.


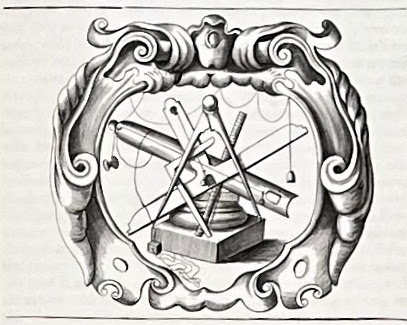
Here are the tools a  Massachusetts Bay Colony carpenter had in 1715 for planning and laying out buildings*. He used a compass, a square, horizontal and vertical levels, a straight edge marked in regular increments (which might or might not be inches) and a line with a spool on one end and a plumb bob on the other. The builder also had an awl, chalk, charcoal, and an 8 or 10 ft. rod.

His square was small and might not have a true 90* corner. His inch, foot, rod, varied from those of other carpenters. He would have learned his skills as an apprentice to a master carpenter, become a journeyman, then a full-fledged carpenter. His training would have included practical geometry. Tape measures had not been invented, paper was precious. He drew plans on framing floors, on sheathing, on dirt. He did not need to be literate.

Using a compass, a straight edge and a scribe a carpenter could layout the plan on a board, then step off the plan on the site with his rod or his compass, set his lines, and true them. This is the same order in which we layout buildings today; we simply use more modern tools.


This is the floor plan of the original house.
Noted in black are the sills, the posts and beams for the first floor frame . 

 The carpenter knew the first floor would have a Hall - on the right labeled 'living room', and a Parlor - on the left called the 'dining room'. 


Between them, in the center of the house would be the chimney stack with a separate flue for each of 4 fireplaces.

Here is the chimney above the roof with articulated flues.  

These spaces add up to a house about 18 ft. wide by 42 ft. long.


The width and length of the house were stepped off with a compass or marked on a length of twine. The exterior of the house would have been staked.  3 foot units could have been stepped off 6 times for the width and 7 times for the length. Layout with a rod marked in feet would probably have been faster. A chalk line might have been snapped. Lines could have been tied to stakes for the men digging the foundation. Diagonals would have trued the foundation. All of this is similar to how we layout buildings today.

Stone foundations of  pre-1900 houses tend to be vertical on the inside of the wall, the basement side, battened into the soil on the exterior. 2 lines would be required to accurately set the top of the foundation - where the sill would sit, where the outside wall of the house would stand.   


The length of the beams of the frame, approximately 18 ft., probably determined the house width.  

The Hall, the biggest room, was a multi- purpose room, used for cooking, chores, gathering. Often set in the southeast corner of the house, it had sunshine from early morning to late afternoon.  Here the room is square with a beam to support the 2nd floor across its center. The arc of the 18' width locates the posts.

Note that the dimensions appear to begin at the inner side of the right hand posts, indicating that while the exterior of the foundation was laid 18 ft. x 42 ft., the layout for the timber frame appears to have been set from the sill and those first posts. 

Laying out the geometry from the inside of the frame would have been a practical choice. The sills would not cover the line, but located beside it. Truing a rectangle by checking its diagonals to the outside corner of a post would be tricky, especially after the posts were in place. The framing timbers also needed to set to the line. And, the outside of a stone foundation could be irregular - as field stones are - without compromising the bearing of the frame on the foundation. 

This length, this inside dimension, would also have been the one the framers used to lay out the mortise and tenon joints on the beams.

Next to the Hall is the chimney stack. In plan it is a 3/4/5 rectangle often used by masons to keep the bricks plumb and level during construction. The fireplaces fit within, their fires creating a massive heat sink.  

The entry and staircase fit into the leftover space in front of the stack.


The Parlor, the room to the left, was used for business and formal occasions, to welcome and entertain visitors. Sometimes it was also the master bedroom.

It was smaller than the Hall and also had a centered beam.  The arcs cross at the outside edge of the wall, setting the width of the room. 

The length of that width could easily be measured from the layout of the Hall. Here the arcs cross, giving 2 points for drawing a line which, extended, is the width of the Parlor. Note the black line with arrows.


Yes, if the line which measured the width of the square of the Hall  had been folded in half and marked, it also would have given the point needed to determine the width of the parlor. In either instance the framer needed to understand the geometry. Geometry was a tool. It was practical. It is also why the proportions of these buildings are graceful; why they speak to us.


The Parson Barnard House, seem from its front garden in 2022.

 Note that the geometry of the house is so strong that the front door of the house seems to be in the middle of the facade. Actually the right side is wider than the left side. The windows on the left  are closer together than those on the right and the wall spaces between the door and the windows on either side are not equal. 

The geometry of the frame and the elevations will be another post.  


* the image is the frontispiece  for  Giancomo Barozzi Da Vignola, *Canon of the Five Orders  of Architecture, translated by John Leeke, published by William Sherwin, 1669. 


** A square can be laid out by a compass. Square corners can be determined and proved by a daisy wheel. Here is the visual explanation: the width A-B as the radius of the circle and locates the 6 points of the circumference A, B, C, D, E, F, G. Then: Lines A-F and B-E are perpendicular to A-B. Line G-C locates the end (west) wall  of the Parlor.


For more information and a tutorial see: https://www.jgrarchitect.com/2023/01/geometry-in-construction-practical.html


Tuesday, November 29, 2022

Virginia Folk Housing, Part 2 of an update


The Moore House* photographed by Henry Glassie, built before 1750.


This house has 2 rooms up and down, 2 fire places, 2 chimneys, and a shed on each end. The main block  is double the size of the house I wrote about in Part1: https://www.jgrarchitect.com/2022/11/virginia-folk-housing-update.html

The geometry begins as it did in Part 1, using the width as the circle's  radius.   


Here is the floor plan: 2 rooms with fireplaces, and sheds on both ends.


The daisy wheel progression begins with a length A-B which becomes the radius of a circle here lettered C-A.


The daisy wheel for this house begins with the left wall of the main house.


That wall's width  is the radius, 1-6. A is the center of the circle. The daisy wheel lays out the other 4 points, 2, 3, 4, 5.  

 Lines 1-3 and  6-4 are the sides of the house. 2-5, the diameter of the circle, lays out the interior wall.


Lines 1-5 and 2-4 can extend forever. Where is the right end wall of the house located? Where is C

It's at the end of the circle, but that's only a point, not a line. 2 points are necessary to draw a line to mark the right end of his foundation and the floor of the house.

If the carpenter extends his arcs he can quickly find the missing points. 

Extend the arc centered at 3 (2-A-4) to B.  The arc centered at 4 (5-A-3) crosses the earlier arc at B.   He has 2 points: A and B, And can draw line A-B

Now C is fixed at the intersection of A-B. C is the center of a new arc, (7-A-8). The extended arc from 5 (6-A) crosses at 7. The arc 2 (1-A) crosses at 8. 7-C-8 locates the right wall.

C also locates the center of the fireplace and the chimney. 

The daisy wheel is often dismissed as a design tool. It is flexible, quickly drawn, and accurate. 

The geometry comes from the first length - the width chosen by the owner and builder for this house. That width, and the house, could be bigger or smaller to suit the owner's needs and budget, as well as to the lumber available for joists and rafters. 

Once the carpenter decides on a width he uses one compass setting, one radius, for the whole layout. Every point is checked. As the lines are marked, the diagonals can prove the layout to be  true.

If he drew a layout at a smaller scale, he could easily step off to full-sized construction dimensions with his compass. He could also draw the layout on the ground, stake the points and mark the wall locations with twine just as framers and masons do today. 

Consider how the plan would be laid out if the circle is not used. Use a 10' pole - a common tool of the time.  Each corner would need to be figured independently;  every dimension stepped off separately, and with what accuracy? 

The daisy wheel locates all angles and lengths quickly. It has built-in checks from the beginning and as the layout progresses: if the circle doesn't close, the 6 points will be uneven, the arcs won't cross, the diagonals will not match. The layout will not be accurate.


 Both wings are 3/4/5 rectangles. See the left shed. The floor plans of wings were usually 3/4/5 rectangles so that they would sit square to the existing house. All the joists would then be the same length; as would be the rafters.  


My earlier complex geometry 'works'; the lines are there. But they don't give the basic information the builder needs: the dimensions of the foundation, the floor plan, the size of the house.


*The Moore House, Fig. 31, Type 5, p, 77; the photograph: p.76. 

Henry Glassie, Folk Housing in Middle Virginia, U Tennessee Press, 1975; plans, drawings and photographs by Henry Glassie.


Monday, November 14, 2022

Virginia Folk Housing, Part 1, an update

The house recorded by Henry Glassie in Folk Housing in Middle Virginia * were basic shelter for people with few resources. They may have been the first house for someone homesteading, built by a sharecropper or by someone enslaved.   

This is Fig. 35, The Parrish House, a "small mid-eighteenth-century house of sawed logs", p. 84 in Glassie's book.*


The geometric diagrams I drew in May 2014,** were accurate but much too complex for these houses. More importantly they didn't begin as a carpenter would: with the size of the foundation and the floor plan.


 A carpenter's first question is, " Why?" Then he asks, "How big? How long? How wide?" 

The red line across the bottom of the floor plan is 'how long', about 21 ft. That distance can be the beginning of the layout, the first Line that determines all the others.


That Line can be the radius for a circle:


The arcs of the Line A-B cross at C. That's the center of the circle for the layout of this house.

In the diagrams below: 1) B-C is the radius of the circle. 2) Beginning with B on the circumference  the arcs of the daisy wheel are added. The 6 even spaced points around the circle A, B, D, E, F, G  are located.


Connect the Lines. A-F and B-E are perpendicular to A-B. G-D is the diameter. They mark the width and length of the rectangle for the house plan.  If there is a question about accuracy, diagonals can be used to true the shape.


Here is the plan within its circle, the circle that begins with the carpenter's choice of width, his 'module'.


The masonry block for the 2 chimneys is square, centered, and 1/3 of the width the house. Glassie's photograph shows a shed sheltering that fireplace.


Part 2: https://www.jgrarchitect.com/2022/11/virginia-folk-housing-update-part-2.html

Another introduction to the geometry: https://www.jgrarchitect.com/2023/01/geometry-in-construction-practical.html


*Henry Glassie, Folk Housing in Middle Virginia, U Tennessee Press, 1975. The book includes more information, drawings, and a photograph of the house. It no longer exists.

** The original post is here:  https://www.jgrarchitect.com/2014/04/18th-c-virginian-folk-houses.html. Its companion, here: https://www.jgrarchitect.com/2014/05/18th-c-virginian-folk-houses-part-2.html

I considered deleting the 2 posts, but their existence brought a comment and question which prompted this update.

Also:

As I read them I realize how much I have learned about geometry since 2014. I saw it and tried to explain it, just as Henry Glassie did in his Rules, Chapter IV, The Architectural Competence.

When I began to study Practical Geometry there were no books, no one for discussions or critiques. I was teaching myself, reading early pattern books line by line. Laurie Smith was the only person I knew who saw geometry as I did, and he was in the UK. Later that year he came to the States; I took a workshop with him. I was able to work with him until his death last year.  

I don't want this information to be lost again. I want others to find it, question it, reject and/or improve upon my analysis, their own analysis, expand our understanding.


Friday, February 25, 2022

James Gibbs' steeples


James Gibbs was the  Surveyor of the Work for the design and construction of St. Martin in the Field, Trafalgar Square, London, begun in 1722, completed in 1726.


 His pattern book, On Architecture, published in 1728, had 150 plates. 7 were engravings for St. Martin's. He writes that Plate II is "The Geometrical Plan of the Church and Portico, shewing the Disposition of the whole Fabrick." (Introduction - i)

Plate III, shown here, is "The West Front and Steeple"


Many churches and steeples are included in Gibbs' book. Plates 29 and 30 show 6 images of steeples, all drawn for St. Martin's but not chosen. Plate 31 has 5 draughts of steeples for St. Mary le Strand. 

In 1775, the Providence (RI) Gazette, writing about the Baptist Meetinghouse, comments on the use of the "middle Figure in the 30th Plate of Gibbs designs" * for the church steeple.


This engraving is the draught (the architectural drawing) of the Geometric Plan of that steeple. Gibbs writes that while steeples are Gothick, "...they have their Beauties, when their parts are well dispos'd, and when the plans of the several Degrees and Orders of which they are compos'd gradually diminish and pass from one form to another without confusion, and when every Part has the appearance of a proper Bearing." (viii)


The Master Builder for the Baptist Meetinghouse was Joseph Brown. How did he know what to do from those instructions? 

He was not only a builder but an astronomer, a scientist and a professor. He knew his Geometry.

How would the parts be 'well dispos'd' or well ordered. That could refers to the pattern of 'base, column and wall, architrave' for each section. 

Or it might be how the parts are all the same height. I have marked on the engraving where each part begins and ends. Each provides physically and visually 'a proper Bearing' for the next level. 


How did the parts 'gradually diminish'?

Below each steeple on Plates 29, 30 and 31 is a cartouche, a diagram: the plan for each steeple, showing the outlines of each steeple part. 

This is the diagram for the middle steeple which was copied for the Baptist Meetinghouse.The image in the book is 1.5" square. It is the size of the image Joseph Brown, Master Builder, would have worked from. 


I have labeled the outlines of each part of the tower to correspond with my numbers on the steeple drawing above. (5) is the base of the 8 sided spire. The innermost circle is the cap where the weather vane is attached.


The parts layer one on the other following a diagram, a pattern - which I refer to as the square and its circle.  This geometry was well known. It goes back in construction to at least the 7th c. in  Constantinople. Serlio placed it on his frontispiece.** 


This variation of the square and its circle, uses only the diagonals and adds the division of the square into quarters. As the design has 8 sided Parts (#3 and 4) and an octagonal spire, perhaps this diagram was used. 


Where the Lines cross the square locates a smaller square, rotated. And those Lines locate the next. They determine the size and location of each Part of the steeple 

The diagram is not meant to be a working drawing. Instead it directs the builder. It does not matter if it is not quite accurate. When the builder lays out the work he will adjust and refine the shapes to fit his frame.  


What happens when the first square is rotated - creating an 8 pointed star?


And the squares that fit inside that square are added?  Drawn here in black over the first diagrams drawn in red.  

The octagons of the Parts are laid out. Drawn on a framing floor the lengths for each wall would be easy to measure and set correctly. 

It's done with just a length of twine and the knowledge of geometry.


The Providence, RI, Baptist Meetinghouse - with its steeple, drawn c. 1800. The image is now in the Library of Congress with the HABS drawings of the Meetinghouse.


* quote from American Architects and Their Books to 1848, ed: Hafertepe and O'Gorman, UMASS Press, 2001, Abbott Lowell Cummings' essay, The Availability of Architectural Books in Eighteenth-Century New England, p. 2.  


** the Geometry of Hagia Sophia's dome (Bannister Fletcher's diagram) 


The lower right corner of Sebastiano Serlio's frontispiece of his On Architecture:  a cube with its diagonals, the circle and the next square that fits within that circle. As can be seen in the steeples drawn by James Gibbs, these circles and squares can grow in and/or out.


 James Gibbs'  diagram using Serlio's square and circle. It also 'works' and could have informed the design. 

 Currently, as I research, I think the 8 Pointed Star was easier and was more likely to have been used .

All books referenced without complete attribution are listed in my bibliography.